
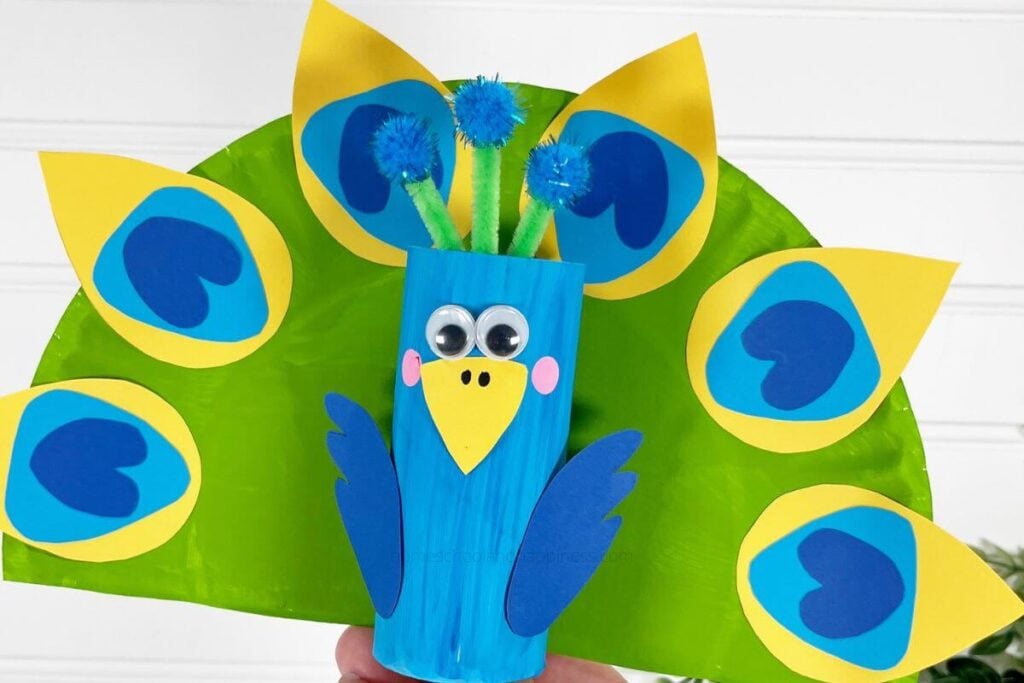
Kids will love painting, gluing, and decorating this cute paper plate peacock. With just a few supplies you can get from your local Dollar Store, it’s an easy and fun craft for them to put together.
Not only is this a fun craft project to help the kids put together, but it is also a great way to learn more about the beautiful creatures.
Why kids will love this paper plate peacock craft
- They get to experiment with different bright and fun colors colors as they put together the cute paper plate peacock.
- It’s a hands on activity that keeps little hands busy cutting, counting, gluing, painting, and working on their fine motor skills.
- Making the paper plate peacock is a fun way to help kids learn more about them. Add in some fun facts as you’re making the craft and it’ll help kids learn more about the beautiful birds.
Fun facts about peacocks kids will love
As you put together the peacock paper plate craft with the kids, this is a great opportunity to teach them some fun facts about the birds. A few facts they may find interesting include?
- Only the male peacocks have those big, fancy tails that we typically see. Females (called peahens) are much plainer.
- A group of peacocks is called a “party”.
- The pretty colors on their feathers aren’t just from pigments. They shimmer because of teeny tiny crystal like structures that bounce light around like a rainbow.
- Peacocks shed their feathers after breeding season. If you’ve ever wanted to collect a peacock feather, that’s the time to do it because as they shed, the feathers just drop to the ground.
- Peacocks can’t swim.
Now that you’ve learned some fun peacock facts, let’s get to making the colorful paper plate peacock.
Paper Plate Peacock Supplies:
- Paper Plate – Dollar Store
- Wiggle Eyes – Dollar Store
- Toilet Paper Tube (toilet paper roll) – Recycled
- Craft Paint – Bright Green, Bright Blue, Pink
- Cardstock – Yellow, Bright Blue, Royal Blue
- Chenille Stem, Bright Green – Dollar Store
- Pom Poms, Bright Blue – Dollar Store
- Glue Gun and Glue Sticks – Dollar Store
- Paintbrush
- Scissors
- Permanent Marker
- Pencil with new eraser
- PATTERNS Paper Plate Peacock (see below)
Instructions
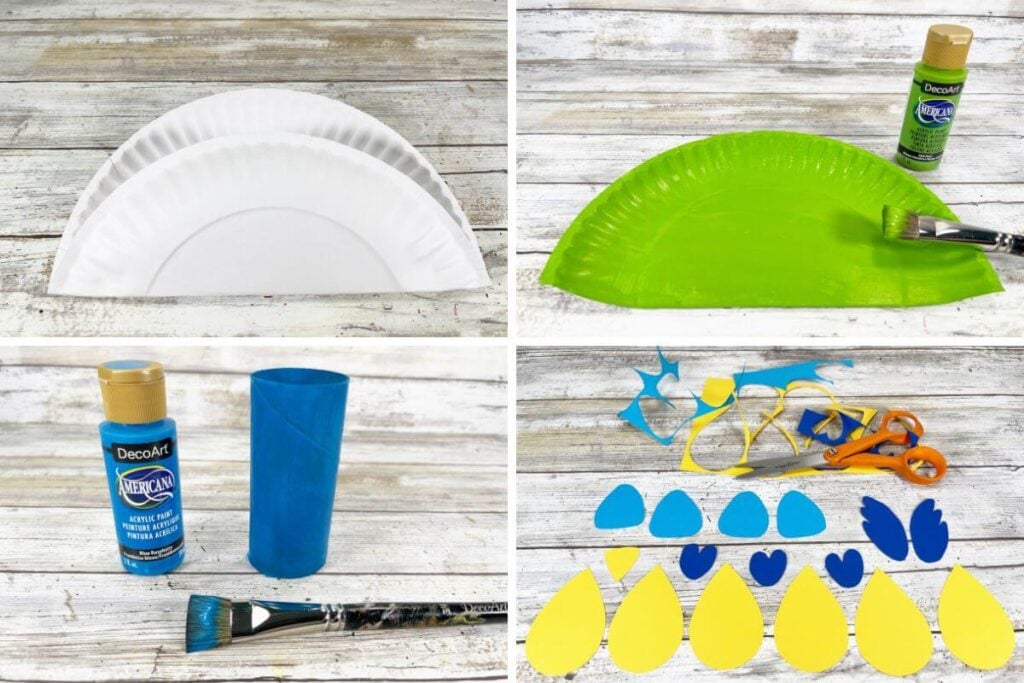
Step 1: Gather all supplies. Fold the paper plate at the 2/3 mark by lining up the bottom edge with the circular indent and crease firmly. Cut the paper plate along the fold with scissors.
Step 2: Basecoat the larger section of the inside of the paper plate with bright green acrylic craft paint. Set aside to dry and apply a second coat, if necessary.
Step 3: Paint the outside of a toilet paper tube with bright blue acrylic craft paint. Set aside to dry and apply a second coat, if necessary.
Step 4: Download and print the Peacock Pattern, then cut out with scissors. Trace the beak once and the teardrop six times onto yellow, trace the rounded triangle six times onto bright blue, trace the wings twice and the rounded heart six times onto royal blue.
Step 5: Cut out the peacock patterns with scissors making sure to cut inside the traced lines for a clean, finished project.
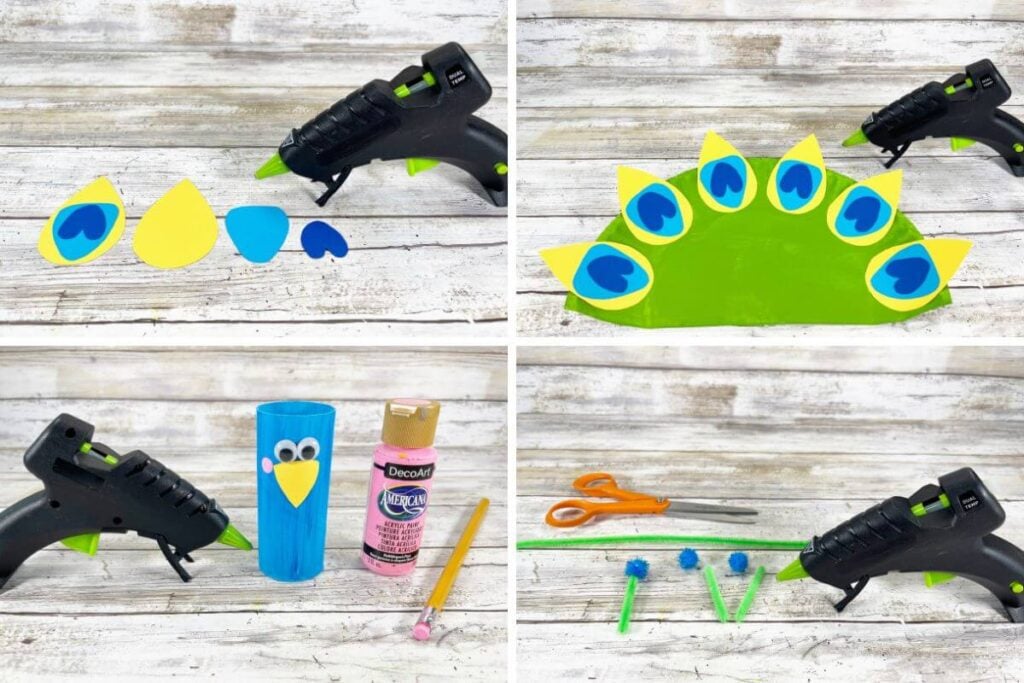
Step 6: Build the peacock feathers by layering the royal blue rounded heart onto the bright blue rounded triangle onto the yellow teardrop. Secure layers with a glue gun and glue sticks.
TIP: You can use liquid craft glue for this project, but you will have to wait for it to dry.
Step 7: Attach the six peacock feathers to the outer edge of the paper plate tail with a glue gun and glue sticks.
Step 8: Attach two wiggle eyes to the peacock’s face with a glue gun and glue sticks, then glue the beak underneath the eyes. Create two cheeks by dipping a new pencil eraser in pink acrylic craft paint and stamping on either side of the beak.
Step 9: Cut a bright green chenille stem in three equal pieces using scissors. Attach a bright blue pom pom to one end of the chenille stem pieces.

Step 10: Attach the pom pom feathers to the inside of the toilet paper tube with a glue gun and glue sticks. Draw two nostrils at the top of the beak with a black marker.
Step 11: Attach the peacock body to the center of the tail with a glue gun and glue sticks. To finish, glue the wings onto the right and left sides of the peacock body.
More Crafts
- Sponge Puppet Craft for Kids – Cute Little Monsters
- Handprint Cactus Paper Craft
- Flower Bookmark Craft with Popsicle Sticks
- Bee Handprint Craft with Paper Plates


